Rooting at Home: Four Small Experiments to Learn Plant Propagation
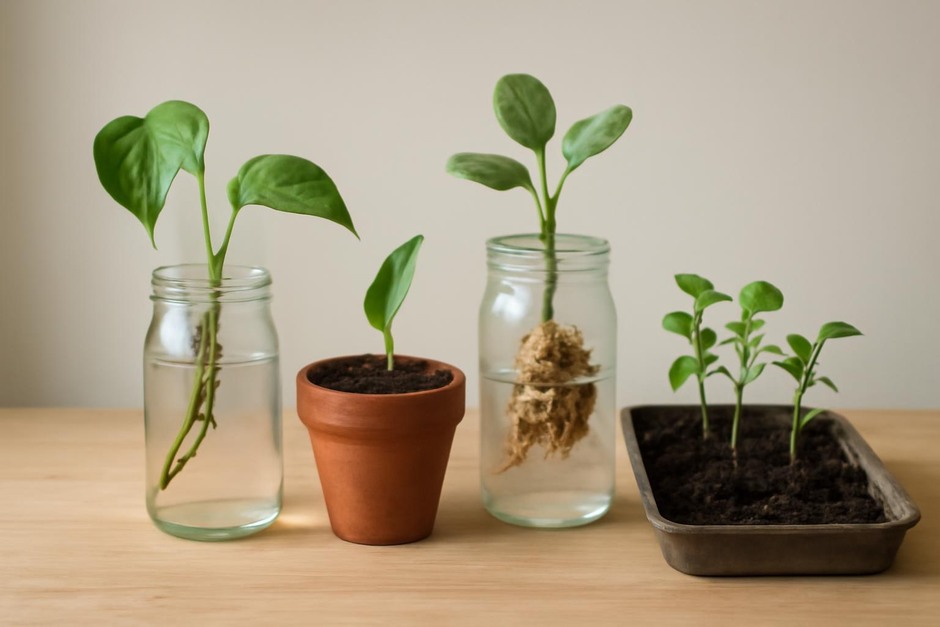
Propagating plants from cuttings is a practical, low‑cost skill that can deepen your connection to the plants in your home. These four small experiments are designed to be done in sequence: each uses a slightly different material and method so you can compare results and build confidence. Choose one common, easy plant to work with (pothos, philodendron, coleus, or basil). Take similar cuttings for each experiment so outcomes are comparable.
Experiment 1: Water Propagation — the most forgiving start
Materials
- Glass jar or vase
- Clean scissors or pruning shears
- Fresh tap water and a spot with indirect light
Steps
- Cut a 8–10 cm (3–4 in) stem with at least two nodes (a node is where leaves or roots emerge).
- Remove lower leaves so nodes can sit in water.
- Place the cutting in the jar with water covering the nodes but not submerging the leaves.
- Change water weekly and observe root emergence over 1–4 weeks.
What you’ll notice: Roots often appear visibly, which makes this method satisfying for beginners.
Trade-offs: Water propagation is simple and transparent, but plants rooted in water sometimes develop weaker root systems for soil growing and may require an acclimation period when potted.
Experiment 2: Soil Propagation — a step toward permanence
Materials
- Small pot and well‑draining potting mix
- Optional: rooting hormone powder
- Humid microclimate (clear plastic bag or small dome)
Steps
- Use a similar cutting to the first experiment and optionally dip the cut end in rooting hormone.
- Plant the cutting into moist potting mix deep enough to cover the lower node.
- Cover with a clear bag or dome to keep humidity high and place in bright, indirect light.
- Check moisture and ventilation every few days; expect roots in 2–6 weeks.
What you’ll notice: Cuttings may seem quieter at first but develop roots suited for soil life.
Trade-offs: Soil propagation prepares plants directly for pot culture and often produces sturdier roots. However, it can be slower to show progress and requires attention to moisture to avoid rot.
Experiment 3: Sphagnum Moss / Semi‑Hydro — combining humidity and aeration
Materials
- Long‑fiber sphagnum moss (rehydrated) or a small pot with coarse medium
- Container with drainage or a breathable wrap
Steps
- Moisten the sphagnum until damp but not dripping.
- Insert the cutting so the node is surrounded by moss and secure it with a clip or tie.
- Keep the moss consistently moist and in bright, indirect light.
- Observe root formation; this often takes 2–5 weeks.
What you’ll notice: Moss provides both moisture and air around the nodes, encouraging fibrous, healthy roots.
Trade-offs: Sphagnum often speeds rooting and reduces rot risk compared with soil, but it can be fiddly to maintain and more expensive than plain potting mix.
Experiment 4: Simple Air‑Layering — a gentle step to larger plants
Materials
- Branch of a larger houseplant
- Small handful of moist sphagnum moss and plastic wrap
- Tie or twist tie
Steps
- Choose a healthy branch and wound a small ring of bark or gently scrape a thin strip to expose inner tissue.
- Wrap the wounded area with damp moss and cover with plastic, sealing both ends with ties.
- Check occasionally to keep moss damp; roots may appear within several weeks to months.
- When roots are visible through the wrap, cut the branch below the root ball and pot it up.
What you’ll notice: Air‑layering allows root development while the cutting remains supported by the parent plant, reducing stress.
Trade-offs: Air‑layering takes more patience and planning but yields large, transplantable sections without removing the branch early.
Putting the experiments together
After completing the four experiments, compare timing, root quality, and ease of transition to pot culture. Log observations: how long until first roots, how white and fibrous they are, and how the cutting reacted when moved to a pot. Each method has contexts where it excels — water propagation is great for learning and visual feedback; soil grows ready‑to‑stay plants; sphagnum balances moisture and air; air‑layering suits woody or larger specimens.
Next steps might include repeating a favorite method with different species, or trying small variations (with or without rooting hormone, different light levels) to explore how material and method affect outcomes. The point of these small experiments is not to find a single “best” way, but to learn the trade‑offs and choose the technique that fits your plants, materials, and daily routine.